Pages

Wednesday, October 29, 2014

Too Cute To Spook!


Hi everyone! Another sweet Halloween project to share right before the big day of spooks and treats! This time a trio of ghosts that really aren't too scary!


If you read my last Halloween post, you will know that this is another adorable vintage wood mounted image from D.O.T.S. but I did add in some of my favorite background stamps too! I also created a bit of visual interest by mounting these cute little ghosts on the inside of the card and creating a cut-out on the front for them to show through! The sentiment is just a part of the D.O.T.S. Halloween Greeting stamp but is perfect for my niece! Ribbon and twine in the traditional holiday colors are the finishing touches for the front of the card.


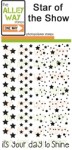
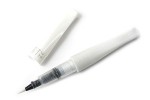
On the inside, happy orange polka dots for the background and the same sweet ghosts! Each of the ghosts were lined with a gray Copic marker and then detailed with white and clear Wink of Stella pens. Nothing like a trio of ghosts to start you off right for trick-or-treating!

Thanks for checking out my blog! Bee Happy!!

Supplies Used:
D.O.T.S. stamps- Halloween Greeting, Hauted Trio Fun
Stampin' Up and Memento Ink, Copic Marker
American Crafts orange card stock
craft store ribbon, Darice hemp cord

Wednesday, October 22, 2014

Beautiful Butterfly Birthday!


Hi everyone! I know it's Fall and I should be using rich Fall colors for my projects but for some reason, I could not resist creating this super feminine and elegant card in shades of pink and gold for my wonderful stepmothers' birthday!


I started with a plain piece of white card stock and jazzed it up with a beautiful background stamp of french words. I then die cut some pretty butterflies and filled in the negative space with elegant gold and white polka dotted paper that also shows in the scalloped edges. I topped off the negative spaces with glittery gold and hot pink butterflies and added in pink and gold gems for shine. Oh so pretty!


The inside is simple with more scalloped edges and a stamped hot pink butterfly. I added in a sweet sentiment and more sparkly gems! I think my stepmom will love it!

Thanks for checking out my blog! Bee Happy!!

Supplies Used:
Stampin' Up ink and French Words background stamp
Bazzil and craft store card stock
My Mind's Eye Market St. 'Nob Hill' 6x6 paper
ribbon from Caramelos Shop at Etsy
Mark richards gold gems


Thursday, October 16, 2014

Cats and Candy Corn!


Hi everyone! It's getting close to Halloween! Now I never get trick-or-treaters because I live in a very rural area and it's just no fun walking  between houses out here. But I do have cute little nieces and nephews that dress up and want to show me their costumes so I have to have goodie bags on hand when they visit! 

I dropped the ball this season and did not buy ANY new Halloween paper or embellishments! However, I do have quite the stash of older Halloween stamps and it was actually quite fun picking some out to use for my holiday projects! These vintage cuties are all from D.O.T.S. (talk about hoarding!) and are wood mounted stamps. All of the supplies, with the exception of the burlap background paper, are all fairly old stash items!


I started with a Spellbinders label and cut three different sizes for each tag and layered them all together.   The images were stamped in Halloween colors and I added hand drawn stitching lines too! I also fussy cut the candy corn pieces, covered them in Glossy Accents and attached them to the bows of the tags!


The cat image was stamped onto the white card stock and then to give it a bit of interest, I cut out another cat and popped it up a bit as you can see in the picture below.


Instead of gems, I used black and orange marker tips for fun little polk dots and attached this one in the corner. More shiny candy corn accent this simple yet cute tag! Now to fill these bags with fun little goodies!!


Thanks for checking out my blog! Bee Happy!!

Supplies Used:
All stamps from D.O.T.S.- Happy Halloween, Candy Corn, Black Cat
Card stock- Papertrey Ink (white), American Crafts (yellow), DCWV (printed burlap)
Distress Markers
Stampin' Up and Memento Ink
Kaisercraft gems
RaisinBoat gingham ribbon
Glossy Accents
Divine Twine
Darice hemp cord
Kraft bags from Hobby Lobby

Thursday, October 9, 2014

Embossing Two Ways!


Hi there! Another Make It Monday challenge = another card! And it's my first Christmas card of the year too! 


This week the challenge was to heat emboss images and then dry emboss over them. Christmas village houses seem to be very popular right now so I went with that theme. I heat embossed city buildings from the PTI City Scene set in some cute but non-traditional holiday colors of pink and green. I also heat embossed a few evergreen trees too and then added details to the buildings with ink. After also heat embossing the sentiment, I dry embossed the entire piece of card stock with the Twist cover plate. Cool technique! I added in a hill of dot embossed snow and the sweetest little pink sequins!


The inside features more hills of snow and two more of those adorable holiday trees. This inside sentiment is also heat embossed and I couldn't resist adding in a few more of those tiny sequins!


Thanks for checking out my blog! Bee Happy!!

Supplies Used:
Stampin' Up glitter card stock, Bazzil card stock
Versamark, Stampin' Up and Papertrey Ink inks pads
Stampin' Up and Ranger embossing powders

Tuesday, October 7, 2014

I Heart Fall!


Hi everyone! Well, it's that time again. The temps are dropping and the leaves are changing which means it's my second favorite season of the year- Autumn!  I have to tell you the reason I love Fall so much in Colorado is that we still have very warm days and some only mildly cool nights. Which gives me a good excuse to wear boots- yay!


In celebration of this beautiful season, I have created some cards featuring gorgeously colored leaves on a pretty gold background. I had originally just planned on making one card but loved the gold embossing and had die cut so many leaves that I just had to make two!


For the first card, I embossed a few Inkadinkadoo images from the 'Circles and Dots' set in gold embossing powder and topped that off with a brilliant burgundy tag tied with a bit of burlap ribbon. I stamped the sentiment in brown ink on a file tab and gave the tiny heart some dimension with Glossy Accents.


The second card is more one layer with the leaves mounted directly on the swirled and dotted background. This time I added a patterned paper behind the file tab and just colored the heart in. I also added in a few gold and copper sequins!


I kept the inside decorations to a minimum since I always like to write a personal message to the recipient but both are still very pretty with borders of more Autumn colored papers and more gorgeous leaves! 


Thanks for checking out my blog! Bee happy!!

I am entering these cards into the SSS Monday Challenge (Falling in love….) and the Lawnscaping Challenge (Patterned Paper)

Supplies Used:
Inkadinkadoo 'Circles and Dots' clear stamp set
Stampin' Up ink and designer patterned paper
Versamark Ink
Zing 'gold' embossing powder 
Sequins: Cartwrights, Crystal Sticker glitter dome dots
Burlap ribbon from Caramelos Shop at Etsy.com

Wednesday, October 1, 2014

Fall Trio!


Hi everyone! As soon as I saw the current Make It Monday over at Papertrey Ink, I knew I had to create! This is a craft project that is right up my alley- cute, cute, cute!


Mason jars are great for so many things besides canning and this project puts them to good use. I took the opportunity to turn some stashed away jars into candleholders that will be on display in my dining room for Thanksgiving! Of course, I couldn't stop at one and I would probably still be happily crafting if this contest didn't have a deadline!


The first jar was painted with buttercream acrylic paint and then heat embossed fall leaves in copper and gold. I added in a big embellished 'junk' bow and a Tremendous Tag with a very sweet sentiment! I added a bit of burlap ribbon around the lid rim, filled it with stones and put in a flickering candle.


Since I had already put large detail right on the first jar, I created a big bow for the second that would attach to the handle. This one was painted in a mixture of napthol red and burnt sienna for a rich Fall color. I added in embossed gold hearts and a bit of lace trim around the top. Lots of embellishments in this bow too. Leaves and rick rack and ribbon along with another Tremendous Tag- this one stamped with an Autumn image. It too is filled with stones and a flickering candle!


Last but definitely not least is the baby jar of the group! This one is painted in a gorgeous iridescent copper and embossed in mini polka dots of white pearl. There is an interesting diamond pattern on this jar that shows up quite nicely too! A smaller embellished tag full of more Fall leaves and sparkly ribbon is wrapped and attached to the top of the jar. These will be beautiful at Thanksgiving dinner and until then, I will enjoy their beauty!

This post has been edited to add this project to the Moxie Fab World Challenge: Cool Canning Jars


Thanks for checking out my blog! Bee Happy!!

Supplies Used:
Liquitex and Americana acrylic paints
Striped ribbon from Stampin' Up, Chevron Burlap ribbon from Kirklands
other ribbon and trim from American crafts and my stash
Canvas Corp. red burlap
Kaisercraft and Crystal Stickers gems
PTI- 1940's Flower and Leaf die


Related Posts Plugin for WordPress, Blogger...