Pages

Monday, December 31, 2018

Love Letter Mini!


Hi everyone! I know Christmas has just passed and I'm sure you are ready for a break from all of the craziness....but it's never a bad thing to be prepared for the next holiday! I'm here to give you some gorgeous inspiration for the holiday of love- Valentine's Day!


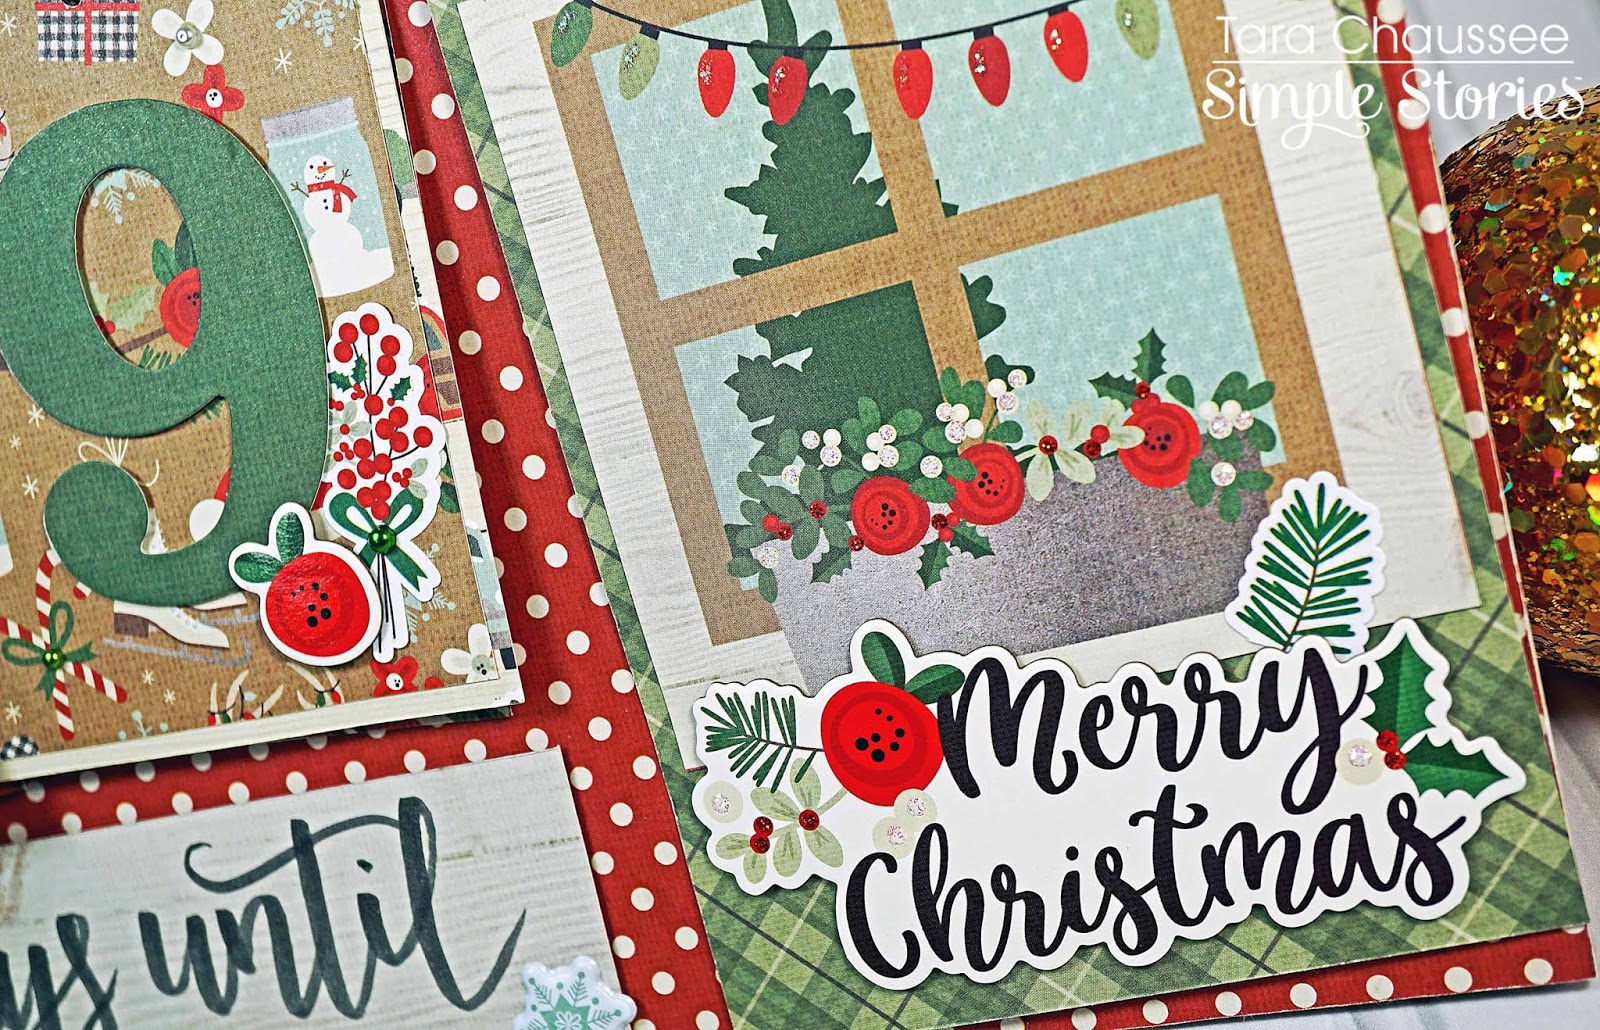
Since Valentine's Day is all about love I was inspired to create a sweet love letter mini scrapbook that can be filled with pictures, letters, mementos and sweet messages to your sweetheart. It's a pretty standard mini album on the outside- chipboard covers and spiral bound- but there are lots of adorable surprises on the inside!


Between the two chipboard covers is an accordion flap that holds eight envelopes and includes a couple of pockets and the beautiful and romantically themed 'Kissing Booth' collection by Simple Stories is the perfect way to show off love and devotion! There are gorgeous patterns with traditional pinks and reds along with other bright colors and the sentiments will definitely put a smile on your face!


I made a variety of envelope sizes and pockets as well as an interactive pull-out made with a strip of the 3x4 journal cards. There are plenty of pages for photos and the envelopes can be filled with mementos or love letters. 


Now you can create your own special love letter mini album for that special person in your life or even as a gift for a special couple! 


You can also visit my YouTube channel for a closer look at this mini and get more inspiration or watch the video below! Happy New Years and Happy Valentine's Day!


Thanks for checking out my blog! Bee Happy!!

Supplies Used:
American Crafts ribbon


Sunday, December 2, 2018

Very Merry Countdown!


Hi everyone! Now that Thanksgiving is over the Christmas countdown has begun! For little children (and probably most adults) the season is full of magic and excitement and a Christmas Countdown Calendar is a fun and easy way to way to build suspense and anticipation until the big day!


The Simple Stories 'Merry & Bright' paper collection is full of bright traditional reds and greens along with the most adorably festive holiday icons and beautiful floral images! People young and old alike will love flipping the sections of this cheerful and jolly Christmas Countdown Calendar!


The idea for this countdown calendar was inspired by the 'Number Pocket Pieces' that are a part of this collection! They are in coordinating colors and designs and in varying sizes so they add a lot of interesting dimension to the pages! The other designs are the charming 3x4 and 4x6 journaling cards along with patterned papers cut to 1/4 inch larger. 


I wanted to really showcase all of the gorgeous papers, so I used two of each for the numbered pages and then one pattern for all of the journal cards. Decorating and embellishing was so easy with the huge selection of festive stickers and chipboard along with a few pearls, gems and glitter! Once I had all of my sections complete, I attached them to the base with metal rings 1/2 inch from the top so there would be plenty of room to flip.


This calendar was made with a base of chipboard that I cut to 11 3/4 inches by 7 inches. This left plenty of room for all of the journaling cards that I used as the pages of the calendar, plus it worked well with the 12x12 sheets of lovely patterned paper. I attached two triangular 'legs' to the back to hold it up and give it good stability. 


The first section has two journal card pages and then numbers from one to three. You could add more if you want to start your countdown super early! The second section also has two decorative journal card pages and numbers from zero to nine so there are tons of number combinations to be made! I included the decorative pages for when the days are in the single digits. My very talented daughter wrote 'days until' on a strip of the woodgrain paper that is part of the collection as well!


Pull out those beautiful Christmas paper collections and make a countdown calendar of your own! There is still plenty of time to get in on the holiday spirit! Wishing you and yours a very Merry Christmas! For a more in-depth look at this wonderful calendar, visit my YouTube channel and watch the video!

Thanks for checking out my blog! Bee Happy!!

Monday, November 26, 2018

Merry Mini Scrapbook!


Hi everyone! So Thanksgiving is over and it's time to start thinking about the Christmas holidays! It's always a good idea to have extra gifts on hand for those unexpected visitors or hostesses. One of my favorites to give is a holiday themed mini scrapbook that anyone would love to receive!


This little beauty was made with a tag die and the adorable 'Merry & Bright' paper collection from Simple Stories! I love this collections' classic color scheme and cheerful images- super sweet and perfect for a Christmas gift!  I used the patterned papers to die cut two chipboard covers and six pages for the inside. 


The chipboard covers have two different patterns on either side and the pages are two different papers adhered together for more strength. I created an accordion folded insert to hold the album together out of another piece of the pretty paper and scored it in one half inch increments.Each of the pages and covers were adhered to this before being hole punched and tied together with homey twine.


I love chunky mini books and with all of the cute embellishments of this collection it was super easy to add lots of layers and dimension to every page. There were stickers galore and chipboard as well as my faves, the bits & pieces and this collection also had a set of tags & frames that were perfectly sized for this mini!. Here are a few of my favorite pages inside the album!


One of the pages is covered with a vellum envelope which is filled with a tag. This creates a fun interactive element (and more room for fun pictures) to the album! There is also a fold up element on one of the pages too! Just because an album is tiny doesn't mean it can't hold a lot!


Head on over to my YouTube channel where you can see this album in detail along with some pointers on how I made it! There is also a video link below! Enjoy!


Thanks for checking out my blog! Bee Happy!!

Supplies Used:
Memory Bos Stitched Main St. Tags
Memory Box Annaleigh Tag Decoration
Cartwrights sequins

Monday, November 19, 2018

Celebrate The Season!


Hi everyone! The Christmas season is upon us and  like a lot of people I wait until the last minute for some gifts! These usually end up being gift cards (which are awesome by the way!) or something small. But, no matter what the gift, It still needs to be wrapped and presented with beauty and love!


Pillow boxes are great for small gifts and the recipient still gets the thrill of a cute package! These boxes take no time at all to die-cut and then decorate with beautiful embellishments and simple adornments. Using a paper collection, like the adorable 'Merry & Bright from Simple Stories, makes the job even more fun because everything is already coordinated for you!


Here I die-cut the pillow box and then wrapped it with a couple more of the gorgeous paper patterns. I added in a sweet tag, a chipboard sticker and a some stickers from the 4x6 sticker sheet along with some chunky twine for a perfectly delightful gift! 


This box was cut from a striped pattern and then embellished with some decorative washi tape from the collection as well as another tag and some charming puffy stickers! I added in my own twine for color and a bit of shine with a metallic dot! So very easy to create beautiful wrapping for even the smallest gifts!


Thanks for checking out my blog! Bee Happy!!

Supplies Used:
Target twine
Bead Landing colored twine

Saturday, November 10, 2018

Happy Fall Season!


Hi everyone! Popping in with a short post for the Color Throwdown Challenge #518. The challenge colors are all about Fall- warm and cozy!


For the orange of the challenge, what could be better than a sweet fox?! I love this stylized one from Papertrey Ink and it looks gorgeous against an embossed blue tag!  I also added in a bit more blue with just peeks of blooms underneath.


To bring in the brown color, I stamped and then die cut some leaves from the same PTI stamp set and layered those along with some orange ones under the fox and tag. The sentiment is also stamped in the warm brown. A few enamel dots are the finishing touch!


Thanks for checking out my bog! Bee Happy!!

Supplies Used:
Sizzix Diamond embossing folder

Thursday, November 8, 2018

Fall Favorites!


Hi everyone! Thanksgiving to me is a time to share love and laughter with family and friends with all of our favorite comfort foods. At our annual Thanksgiving dinner, I make the main portion of the meal but ask everyone to bring their favorite dish to share. As we our enjoying our meal we always say how wonderful everything is and we wish we had the recipes to make the dishes ourselves. So in the spirit of Thanksgiving I decide to create a family cookbook to collect all of those divine recipes that I want to enjoy all year long!


I chose three of the beautiful patterned papers from the Simple Stories 'Forever Fall' paper collection and folded up one edge to create a pocket. Using my sewing machine I stitched around the sides and bottoms for extra detail and then folded the papers in half to create 6 pockets. Since I knew this would be used in the kitchen, I gave it a clear cover cut from an Avery job ticket holder! I stacked all of the pockets together along with the plastic and sewed down the center to keep it all together!


I used the charming and beautiful  journal cards, Bits & Pieces, chipboard and stickers to decorate and embellish the cover and pockets of my cookbook. I also added in some fun family Fall photos along with some journaling areas so this will be a treasured keepsake as well!


I made the recipe cards using the other patterned papers in the collection and some of the gorgeous 'Forever Fall' digital images that are available. Using a paper design app, I made the recipe cards and printed them put onto heavy printer paper. Easy peasy and super cute! I scored all of my cards so they can be open or folded close.


Each page was given a tab made with the stickers of the collection and then I used a label printer to make the labels so the recipes will be easy to organize and find. I have a feeling when my friends and family see this adorable collection cookbook they will all be wanting one for themselves! 


Thanks for checking out my blog! Bee Happy!!

Supplies Used:
'Forever Fall' digital images
sewing machine and thread

Thursday, October 25, 2018

Happy Haunts!


Hi everyone! Still needing some Halloween cards for your favorite goblins and ghouls? Use a fabulous paper collection like this Simple Stories 'Simple Vintage Halloween' and make super cute cards in no time at all!


I started these cards by choosing some of the awesome paper for the backgrounds. There are so many great patterns to choose from and they all coordinate so wonderfully together! On top of that I layered on lots of the the adorable and spooky 'Bits & Pieces' together' with the stickers and chipboard of the collection.


Using  foam adhesive behind some of the pieces allowed me to stack them and give the cards great dimension! It also allowed me a bit of space to add in some shiny sequins and small stickers. All in all these cards have great details and will make someone's holiday very special!


Thanks for checking out my blog! Bee Happy!!

Supplies Used:

Monday, October 22, 2018

Wedding Bliss!


Hi everyone! The wedding season is winding down but I have another gorgeous mini album to share! This sweet little scrapbook was made for a beautiful young lady that I have known for many years. I don't know how it's possible that she gets older and I stay the same age???! Hehe...


The paper collection I used for this album is an older one from Echo Park Paper Co. but the colors fit her Fall wedding perfectly and you can never go wrong with paper from Echo Park! Plus there are gold foil accents throughout which really highlight the lovely patterns!


This album, that flips at the top, is made of varying shapes of chipboard and each page is a different size. Here you can see all the fronts of the pages and how wonderful the patterned paper coordinates together!


The backs of the pages look awesome too! I layered in lots of stickers with the sweet sentiments and some gold accents of my own as well! I am loving the silhouette of that car- so cute!


Wedding albums are always such a joy to make! I love helping a new couple remember their happy day I know the bride and groom will have a great time adding their wedding photos to this mini album! Be sure and see the video on YouTube!


Thanks for checking out my blog! Bee Happy!!

Supplies Used:
ribbon 
Related Posts Plugin for WordPress, Blogger...